Periodically we get questions asking about what realhostip DNS name is exactly doing in CloudStack. Realhostip.com domain exists to make HTTPS work across all CloudStack installations in different customer sites, without administrators to worry about how to load a SSL certificate due to deployment environment changes. SSL certificates are used in CloudStack system VMs to host HTTPS connections, for example, console proxy VM and Secondary storage VM, both uses it in its HTTP server. Realhostip.com SSL certificate is signed with wild-match addresses, all DNS names under *.realhostip.com are qualified to use the certificate. Because of the fact that every CloudStack customer has its own environment, every each one has their own sets of system VMs in their installations and each system VM instance has their own sets of IP addresses. To use ONE certificate to apply for all these instances among different customers, we came out with a solution by providing dynamic DNS service hosted by CloudStack, the DDNS service basically translates following form of DNS names to IP addresses xxx-xxx-xxx-xxx.realhostip.com to IP address xxx.xxx.xxx.xxx CloudStack has control of IP address in each installation, so whenever we need a SSL certificate, does not matter which customer is running the installation, with such DDNS service is available, we can always assign it a suffix under realhostip.com domain on top of ever-changing IP addresses, this is the trick we play to make ONE SSL certificate applicable universally among all CloudStack installations. In most of these cases, the ugly formed DNS name is not visible to end users, since its main purpose is to help establish secure communication channel (not truly to certify a site), however, there are cases that customer may do care, therefore, Console proxy VM does provide customizable way for users to use their own SSL certificates
Realhostip will disappear from future versions of Cloudstack as it adds extra complexity and makes the setup dependent on a 3rd party service, not to mention it requires one to have a working connection to the Internet which is not always the case with private cloud deployments.
With the introduction out of the way, let's proceed to the actual steps required to run such a service yourself. You will need 3 things mainly:
- the software who runs the wildcard DNS service
- a domain name
- a wildcard certificate for this domain name (can be self-signed if you don't mind the browser complaints)
Tip: You can also have a look at this if you don't want to run this DNS software: http://support.citrix.com/article/CTX133468
In my setup I have dedicated a virtual machine with CentOS 6.5 64bit and a public IP address to run both the cloudstack management server and the "realhostip" DNS service. Read below how to install it (copy/paste style):
# get all the prerequisites
yum -y install git java-1.7.0-openjdk-devel
cd /usr/local
git clone https://github.com/ke4qqq/RHIP
cd RHIP
# RHIP was built with java 1.5 originally, we need to modify the build script to use 1.7
sed -i s/1.5/1.7/g build.sh
# build it
./build.sh
# build the zone file for your domain
cp named.realhostip.com named.mydomain.tld
sed -i s/realhostip.com/mydomain.tld/g named.mydomain.tld
# open named.mydomain.tld in your favourite editor and update it with your own details, the ns A entries should point to the local machine
vi named.mydomain.tld
# make sure there is no DNS server running on this machine already
# launch the program, it requires the following 4 parameters: domain name, zone file, port and log configuration file
# add the line below to /etc/rc.local if you want it to start at boot
cd /usr/local/RHIP/; setsid ./run.sh mydomain.tld named.mydomain.tld 53 log4j.properties
If at the registrar of your domain name you have pointed the nameserver to the box running RHIP then you should be able to already get some DNS records:
host 1-2-3-8.mydomain.tld
1-2-3-8.mydomain.tld has address 1.2.3.8
The software is installed, configured and running, now we need to configure the Cloudstack part of things.
Login as admin in the UI, go to Infrastructure, click on SSL Certificate (upper right), in the Certificate box paste the contents of your certificate (PEM/Apache2 format is ok), in the PKCS#8 Private Key field paste the contents of your key and in the DNS Domain Suffix field put your own domain, e.g. mydomain.tld.
After you click OK Cloudstack will restart the system VMs so they load the new certificate and next time you open a console you will be using your own service instead of realhostip.com
We are almost done. In many cases the certificate comes with an intermediare CA certificate. In my case I ended up with a PossitiveSSL wildcard cert from Comodo (the cheapest I could find), so when they sent me the certificate they also sent an intermediate one... The problem is the intermediate CA cert cannot be added from the web interface. What I did is to install phpMyAdmin on the virtual machine and add it manually from there. Here's how:
- install and login in phpMyAdmin
- select the "cloud" database and click on the "keystore" table
- you should see a row with your certificate from the previous step and one for realhostip.com, delete the realhostip.com one
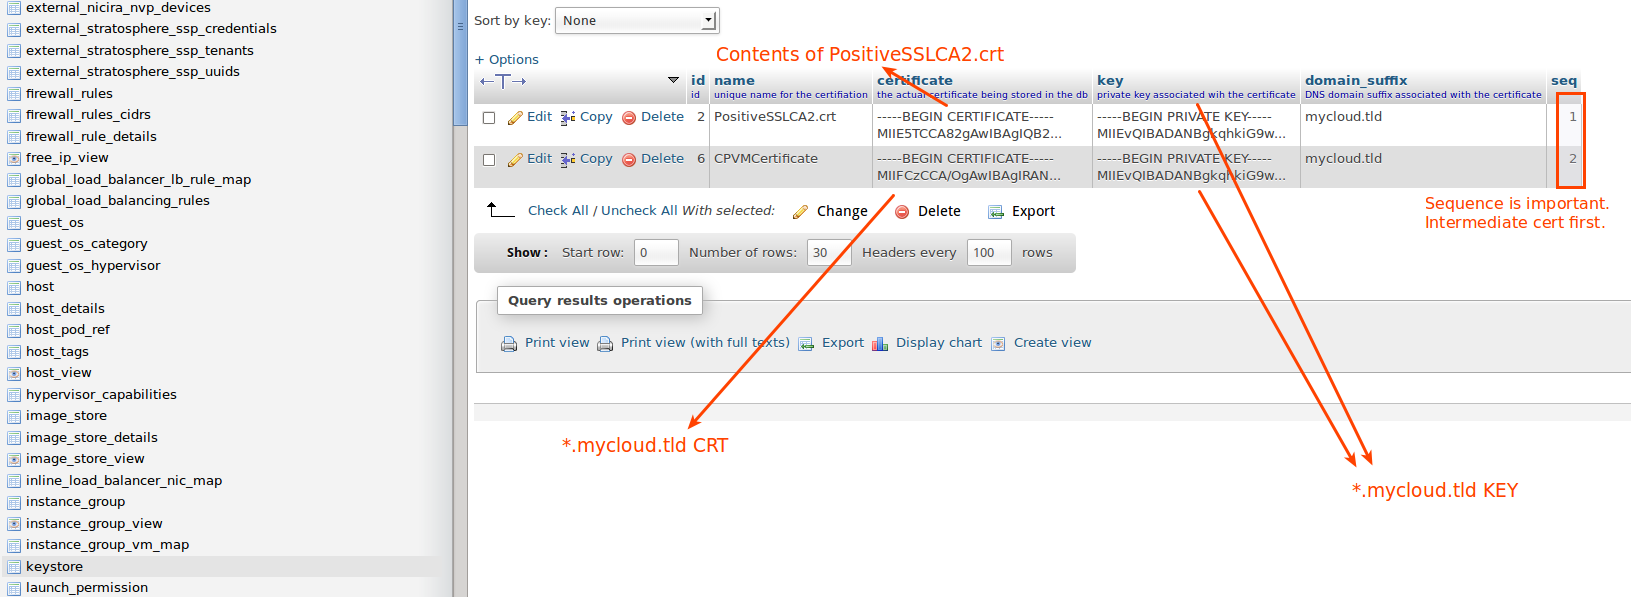
- insert a new row, id can be anything, 2, 3, etc; name can be anything; in the "certificate" text box add your CA intermediate, key can be "null" so tick the null check box, domain_suffix is mydomain.tld
- the "seq" field is important, the intermediate seq number needs to be smaller, ie use 1 for it and 2 for the existing row, like here
Good luck!